
How to Photograph the Northern Lights: A Guide to Capturing Nature's Spectacular Light Show
Explore tips on how to capture stunning images of the Northern Lights, from choosing the right time and location to understanding camera settings.
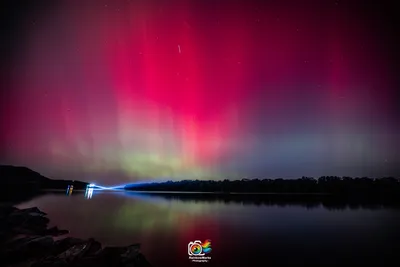
With the recent influx of solar activity the ability for more parts of the United States to see the Northern Lights (aurora borealis) has increased many times over the past year. We are in a peak phase of sun activity this year and may continue to have opportunities for the near future, but you never know, so if you’ve got an opportunity to get outside, do it!
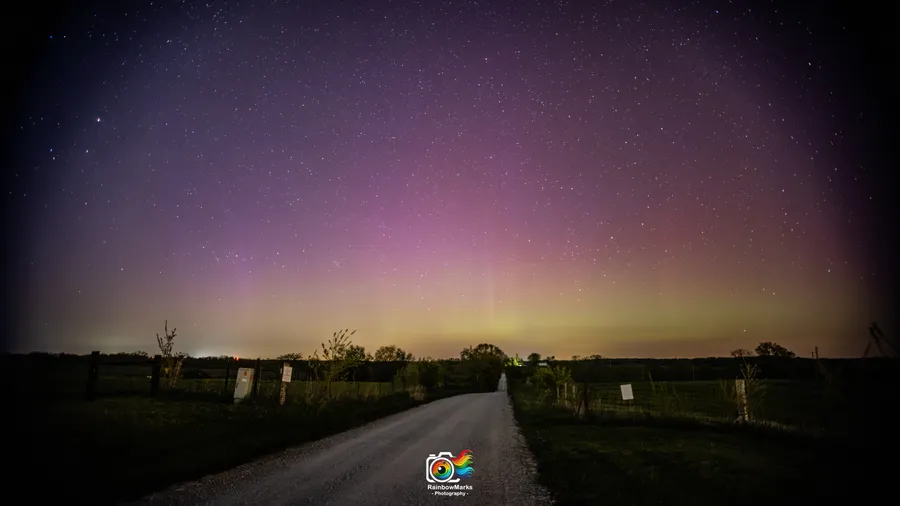
See some of the output from these tips
The Northern Lights, or Aurora Borealis, are one of the most breathtaking natural phenomena to witness. Capturing them through photography, however, can be tricky due to the unique conditions and low-light environment. Here’s a comprehensive guide on how to best photograph the Northern Lights and come home with stunning images.
1. Choose the Right Time and Location
The Northern Lights are most visible in areas close to the magnetic poles, such as Norway, Iceland, Alaska, and parts of Canada. Timing is key — the best chances for viewing occur during the winter months when the nights are longer and skies are clearer. It’s also important to check solar activity forecasts, as auroras are more intense during high solar activity.
Pro Tip: Apps like My Aurora Forecast or websites like spaceweather.gov can help predict when the aurora will be active in your location.
October 2024 thoughts:
The event currently scheduled for October 10th and 11th 2024 may be visible from as far south in the US as Alabama. Everyone in the country should be thinking about getting outside these evenings to see if they can find the Northern Lights. There is no guarantee that you’ll see them, but you definitely won’t if you stay inside.
2. Essential Gear for Northern Lights Photography
You don’t need a fancy setup to capture the Northern Lights, but the right equipment will ensure your photos are sharp and detailed.
- Camera: A DSLR or mirrorless camera with manual settings is ideal.
- Lens: Use a wide-angle lens (14-24mm) with a fast aperture (f/2.8 or lower) to capture as much of the sky as possible.
- Tripod: A sturdy tripod is a must. You’ll be shooting long exposures, so keeping the camera still is crucial.
- Remote Shutter or Timer: To avoid camera shake, use a remote shutter or set a delay timer.
Pro Tip: Bring extra batteries — cold weather can drain them quickly!
3. Set Up Your Camera
Understanding your camera’s settings is essential to photographing the Northern Lights. Since each aurora display varies in brightness and movement, experimenting with these settings will help you capture the perfect shot:
- Aperture: Set your lens to its widest aperture (f/2.8 or lower) to allow maximum light.
- ISO: Start with an ISO of 800-1600. If the lights are faint, increase the ISO, but be careful not to introduce too much noise.
- Shutter Speed: Adjust based on the intensity of the lights. A starting point is 5-15 seconds. If the aurora is moving fast, use shorter exposures (5-10 seconds) to avoid blurring the details.
- Focus: Manually set your focus to infinity or focus on a distant light source, such as stars or a faraway mountain. Use live view mode to fine-tune the sharpness.
Pro Tip: Take a few test shots and zoom in to ensure the stars are sharp. Autofocus often struggles in low light, so manual focus is usually best.
4. Framing and Composition
While the Northern Lights are the stars of the show, incorporating foreground elements like trees, mountains, or water can make your images more dynamic. The key is balance — don’t let the foreground overpower the aurora, but use it to add depth and context to your shot.
- Silhouettes: A tree line or cabin can add drama without distracting from the lights.
- Reflections: If you’re near a body of water, try to capture the reflection of the lights in the water for an added layer of beauty.
- Rule of Thirds: Use this composition rule to position the horizon on the lower third of the frame, giving the sky more space.
Pro Tip: Use a headlamp with a red filter when setting up. Red light won’t impact your night vision as much as white light.
5. Post-Processing Tips
Once you’ve captured your photos, post-processing can help bring out the beauty of the aurora.
- Noise Reduction: Shooting at high ISOs can introduce noise, so use software like Adobe Lightroom or Photoshop to reduce noise in your images.
- Contrast and Exposure: Enhance the vibrancy and detail of the Northern Lights by adjusting the contrast, highlights, and shadows. Be careful not to over-edit and lose the natural look.
- Sharpening: A bit of sharpening can bring out the stars and details in the aurora.
6. Patience and Perseverance
The Northern Lights are unpredictable. Sometimes they may appear for only a few minutes, while other times they could dance for hours. Be patient, keep shooting, and embrace the serenity of the experience. Often, the best shots come from waiting through long, cold nights for the perfect moment.
Pro Tip: Always dress warmly and bring hot drinks or snacks to keep comfortable during long shooting sessions.
Conclusion
Photographing the Northern Lights can be challenging but also immensely rewarding. With the right equipment, settings, and a bit of patience, you’ll be able to capture stunning images of one of nature’s most magical displays. Remember to enjoy the moment, as seeing the aurora with your own eyes is an unforgettable experience — the photos are just the icing on the cake!