
· Chris Hammond
Last Updated
How to photograph the NEOWISE Comet
Learn how to find and photograph the NEOWISE comet in the night sky with helpful tips on gear, timing, and camera settings.

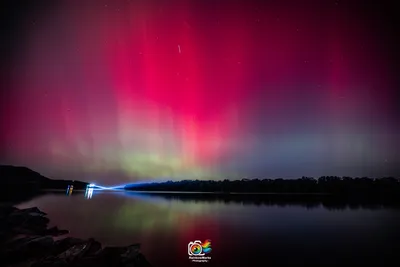
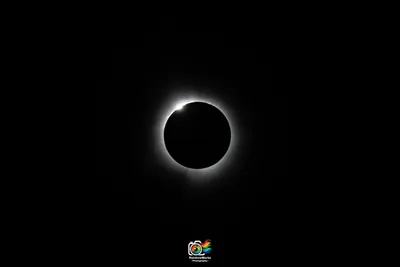
Living here in Wildwood, MO we have had access to some awesome events over the past few years. In August 2017 the total eclipse passed right over our city with some of the longest times available in the country. This week we’re fortunate enough to be able to see the Comet Neowise that was discovered back in March and recently travelled near the Sun and became (somewhat) visible to the naked eye due to that pass.
Over the past three evenings I’ve been out trying to get photos of the comet, and have had some decent luck doing so. I figured I would post some information on how I was able to do this to try to assist anyone who might be interested in trying to spot the comet, and maybe even take a photo.
Tools:
- You
- Binoculars
- iPhone
- Night Sky App
- Camera
- Tripod
- Long Lens
TL;DR
If you really want to cut to the chase, here are the quick tips to finding and shooting the comet.
- Try to find a dark sky (https://www.darksitefinder.com/) but you can likely do it from anywhere you can see the northwest sky/horizon.
- Download Night Sky app in iOS and look for the comet there, point your phone in that direction
- Setup your camera on a tripod, point your camera in the direction of the comet based on the app.
- Use the fastest lens you have, what is fast, whatever lets the most light in F1.4 is better than F2.8 which is better than F4.0
- Switch to Manual mode on your camera
- If your camera will show you, check the exposure before you shoot, try to make sure the shot will not be way under exposed, or over exposed. Adjust the shutter duration to go up or down on exposure.
- Press button
- View Photo
- Find Comet
- Celebrate success
- Rinse and repeat from Step 6 through Step 10
Now for more details, read the rest of this post.
When to see the Neowise Comet?
So the first thing you need to do is to figure out when/where to look for the comet. It isn’t quite known how long the comet will be visible, so I recommend taking the opportunity to find it as soon as you can. If you find it one night, you can always try again the next night too! If you don’t find it the first night, try again the next.
Weather is going to matter in finding the comet, cloud cover will hinder your efforts for finding it, so pay attention to the forecast for the next couple of weeks to try to find an evening/night that is going to be clear.
When to see the Neowise Comet?
With the sun setting around 830pm the past few evenings, I was able to find the comet (in photos) at 9:24pm on the 12th, 9:21pm on the 13th and 9:07pm on the 14th. That’s not to say you can’t find it earlier than that, I just struggled finding it until the darkness really started to set in and stars started to appear in the sky.
Where to see the Neowise Comet?
The first two nights I went out into St. Charles County to the Weldon Spring Site, a superfund site that has a park and mound that you can walk up on top of. The mound technically is not open to the public after dark, I tried not to stay too long after sunset… The mound offers a great view of St. Charles county, with no obstruction of the skyline for miles and miles in any direction. The third night I used my front yard and had to work around quite a few trees in the area, limiting my ability to see the comet for as long as I could on the mound.
For the central United States (I’m writing this from just outside of St. Louis, Missouri) you’re going to look to the north west sky after the sun sets. You’re going to want to find the Big Dipper, if you’re looking around 9pm or just after it will be “pointing down” meaning the largest portion of the pot/ladle will be somewhat parallel to the ground. Between the bottom of the big dipper and the ground is where you will find the comet.
If you’re using an iPhone, try downloading the Night Sky app. I have found that to be useful in trying to track things down, though not 100% accurate as to the “height” of the comet, it at least gets you looking in the right direction.
Finding the comet
Once you are looking in the right direction, you need to actually find the comet, this is the hard part. The first night I was out, we couldn’t spot it. I didn’t even realize I got a photo of it until I got home and looked at the photos on a computer the next morning. Once I spotted it though, I knew I had been looking in the wrong place. The Night Sky app made me think it would be right on the horizon the whole evening and it was much higher and to the right than I expected.
So, tips on finding the comet.
- Go dark, find as dark a place as you can. Try to avoid looking at your phone too much. Try to avoid looking at lights. Get your eyes adjusted, used to the dark, so that stars start popping out.
- Use a camera, try to find it in a photo (see some camera tips below). If you can find it with a longer exposure camera shot, that will likely help you try to locate it in the sky. I find looking through a view finder with a zoom lens to be easier than trying to use a “live view” digital display on a camera.
- Use binoculars. They don’t even have to be high dollar binoculars, my 7 year old son found it with a plastic pair of binoculars he probably got when he was 2 years old. The added magnification definitely helps.
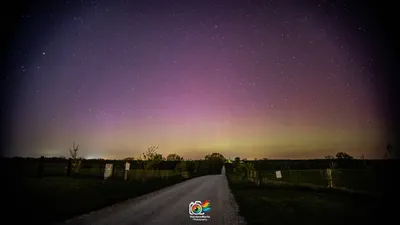
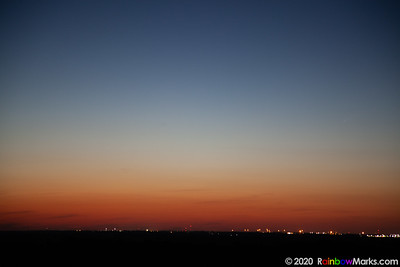
So what are you looking for? You’re looking for a star really, that’s what it looks like, it is not a bright star, it is rather faint, but if you can find it, and focus on it, you might be able to start to see the “tail”. Here is a photo that if you look closely you might be able to see the comet. At the bottom of the photo, look at the power pole (the black pole) and follow that directly up towards the top third of the photo. You’ll see a very very faint spec, that’s the comet. (click the photo to view a larger version)

The tail of the comet starts out pointing towards 2 o’clock or so on a clock. Here’s a zoomed in view of the same photo above, notice you can’t really see the tail yet, though I’ve attempted to draw in where it should be

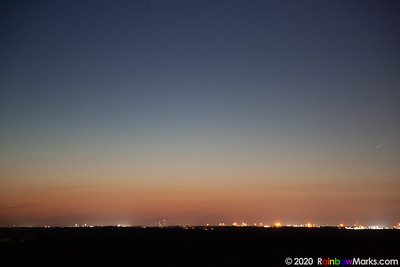
So once you find the comet, you’re going to need to keep track of it. It isn’t “moving across the sky” like a shooting star, but it will rotate with the night sky (as the earth turns). That first photo was taken at 9:07pm central time, here is one taken at 9:53 pm central time. This photo is zoomed in (300mm) but the tree you’re seeing is the one in the bottom right of the original photo, so you can see just how much the comet moved across the sky in 46 minutes.

You’re going to lose the comet at some point throughout the night, if you haven’t lost it behind an object, you may just need to reset yourself and locate it similar to how you first find/found it mentioned above.
Photographing the Neowise Comet
What about taking photos of the comet? There’s art and magic to that, and I definitely don’t claim to be an expert in the practice, but here is what I’ve found.
Taking photos at night requires a combination of settings, tools, patience and practice. If you have a camera with swappable lenses, you will want something with a good aperture.
Equipment I used:
- Camera: Canon 5D Mark II (purchased in 2009)
- Tripod: ProMaster Specialist SP425CK Carbon Fiber Tripod Kit
- Lenses:
- Canon 24-105mm F4
- Sigma 120-300mm F2.8
- Wired Remote Shutter Release
The first night I shot with a 24-105mm F4 Canon lens on my Canon 5D Mark II. This lens is F4, which is okay for during the day, but not great at night, you want a lower aperture, like F2.8 if you can. At 105mm F4, shooting ISO400 I took a 1.6 second exposure to get this shot, the first one I can find the comet in.
The problem with longer exposures is movement, of the stars, and of your equipment. You can see the lights in the bottom of this photo aren’t super focused. This second photo was taken that same night at 9:41pm, 105mm F4 ISO 3200 with a 2 second exposure.
With both of those photos I didn’t actually know I had the comet until the next morning when viewing/editing the photos on my desktop. After finding the comet in the photos I decided that I needed to pick up a better lens (better aperture) and try again, so I went down to the local camera store here in St. Louis before they closed on Monday evening and rented a Sigma 120mm-300mm F2.8 lens. This is a SUPER nice lens, but also pricey, with a deposit of around $3500 just to rent it. It also is rather heavy, so be sure you’ve got a nice sturdy tripod.
Monday night I went back out to the mound with the new lens and got there just as the sun finish setting. I knew I wouldn’t find the comet super early after sunset, so I wasn’t in a rush to try to get setup. At 9:21pm I was able to locate the comet in a photo on the display of my camera (zooming in to the photo view after) and thus knew where I was going to be aiming/shooting the rest of the night. A good friend of mine was with me and he educated me on Mirror lock. Which in a DSLR basically means the camera will move the mirror, and lock it in place, then requiring you to press the button again to open the shutter. This allows you to move the mirror, let the camera stabilize, and then open the shutter. Otherwise the mirror moves and the shutter opens in a quick motion, which can cause jiggle in the camera. With Mirror Lock you just have to make shooting a two step process, one button press to move the mirror, one to open the shutter.
Here is one of the shots taken at 9:22pm 120mm ISO 400 F2.8 with a .8 second exposure.

This is a shot zoomed in at 300mm ISO 1250 F2.8 with a 1.3 second exposure, taken at 9:36pm central.

Tips for shooting the comet
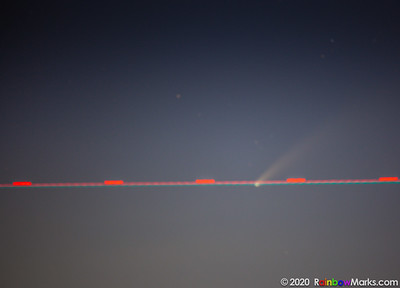
Practice! Focusing on the comet will be hard, nearly impossible by hand with a 5dMarkII, so I would recommend that you find another bright star and focus on that, then turn off your autofocus. You don’t want the focus to be off, otherwise you might miss the opportunity of a lifetime when a plane passes through the picture, and you find out afterwards that your focus was off.
I focused primarily on Jupiter, which was opposite the comet and was one of the brightest objects in the sky. Here’s a photo of the planet and some of it’s moons. No the best photo, but I thought it was cool that the moons showed up. 300mm ISO 6400 F2.8 and 1 second exposure.

The key to doing this is simply practice, get out and shoot as much as you can. Try lots of settings, change your ISO, see how much noise your photos get as you go higher in ISO, some newer cameras are much better at high ISO, which allows you to lower your shutter exposure time to get faster shots. Play with your exposure times, increase them, decrease them, see what works out best for your camera. I played with 30 second exposures and you get a lot of movement of the starts and comet with a 30 second exposure, which creates a not good photo, so I didn’t bother processing any of those.
Most importantly, just get out and see it. Have fun, enjoy this world we live in, the comet is one of the “bright” spots of 2020. Here is a slideshow of the various photos I’ve posted from the comet so far.

And one final animation of the comet moving out of my view on July 14th.